Product detail
Our e-commerce theme offers three distinct Product Detail Page layouts: Default, Simple, and Complex. Each is meticulously designed to suit different marketing strategies, product types, and user-experience goals. This guide explains the features of each layout and how to apply them to your products.
Overview
Default Layout Centered, vertical stacking | Minimalist products, mobile-first setups | Single-column flow, easy configuration, optimal for simple descriptions. Simple Layout Split 2-column (Image/Details) | Standard products with variations | Image gallery thumbnails, cross-selling "May you can like" module. Complex Layout Multi-section, 3-column | Premium/high-end products, urgency-driven sales | Urgency timer, taste profile bars, bundle offers, heavy cross-selling.
A. Layout A; Default layout

When to use: Great for commodities or products with few variations. Its simplicity minimizes distraction, keeping the user focused solely on the purchase action.
How to configure:
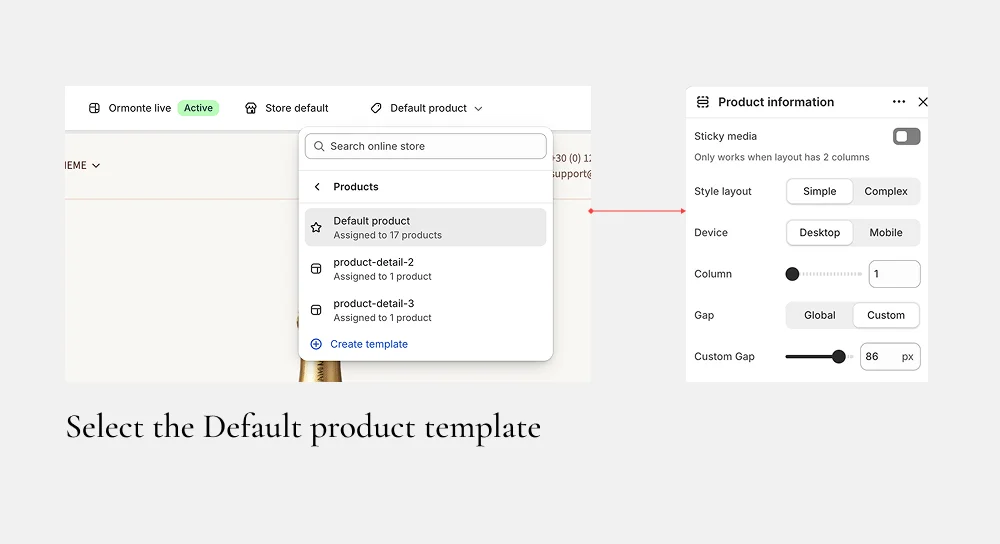
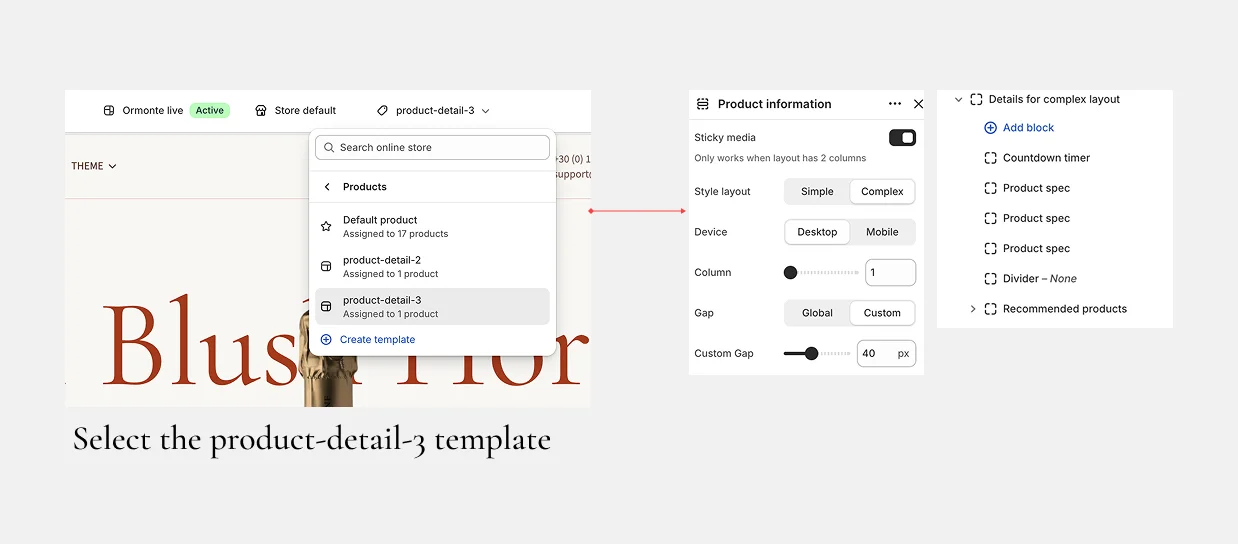
- Open your store's theme editor (the top left of your screenshots shows "Ormonte live", "Store default").
- Click the template dropdown menu in the top navigation bar.
- Search for or select the product template you wish to edit from the list.
- Once selected, click on the Product information block in the left-side panel to open its detailed configuration settings (the panel shown on the right side of your screenshots).
- Configure the Main Settings:
- Sticky media: Toggle OFF. (Note: As the tooltip says, this only works when the layout has 2 columns).
- Style layout: Select
Simple. - Device: Select
Desktop. - Column: Drag the slider to 1.
- Gap: Select
Global. - Custom Gap: Set the slider to 86 px (which controls the vertical spacing between the image, text, and buttons).
B. Layout B: Simple layout
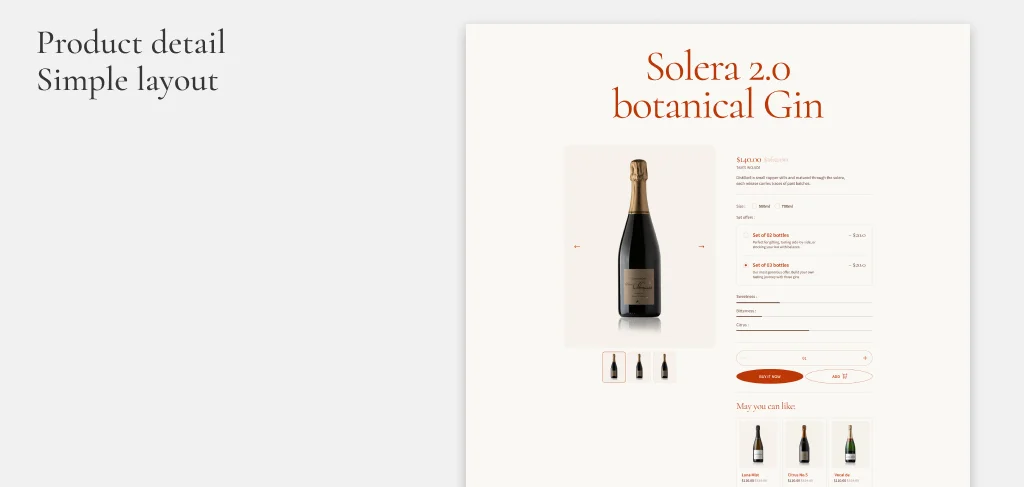
When to use: Best for products that have multiple variations (like bundles) or where visual browsing via thumbnails is essential. The bottom carousel helps increase average order value (AOV).
How to configure:
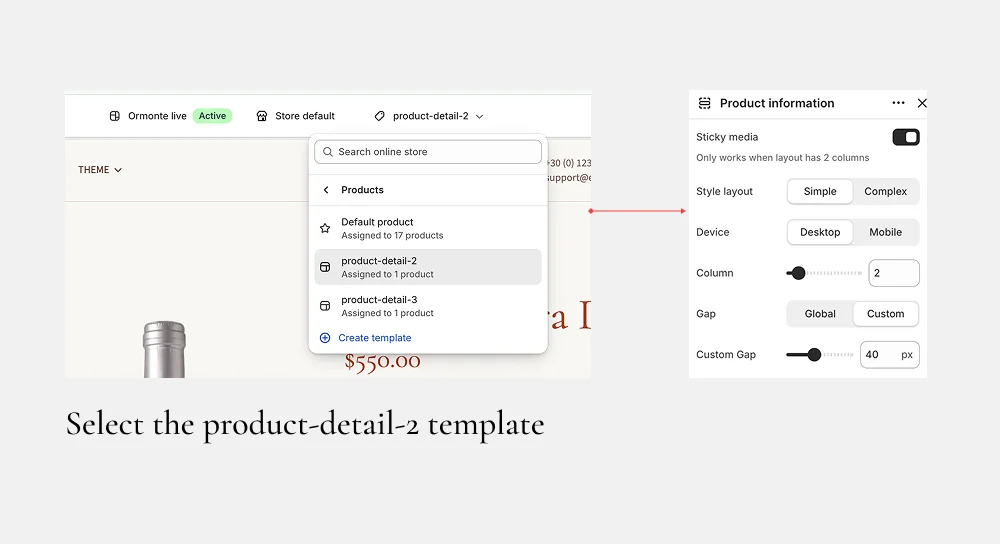
- Open your store's theme editor (the top left of your screenshots shows "Ormonte live", "Store default").
- Click the template dropdown menu in the top navigation bar.
- Search for or select the product template you wish to edit from the list. In the top dropdown, choose the
product-detail-2template - Once selected, click on the Product information block in the left-side panel to open its detailed configuration settings (the panel shown on the right side of your screenshots).
- Configure the Main Settings:
- Sticky media: Toggle ON. (The "Sticky media" feature will now be activated because this layout uses 2 columns, meaning the product image will stay visible as users scroll through the description on the right).
- Style layout: Select
Simple. - Device: Select
Desktop. - Column: Drag the slider to 2.
- Gap: Select
Global. - Custom Gap: Set the slider to 40 px.
C. Layout C: Complex layout
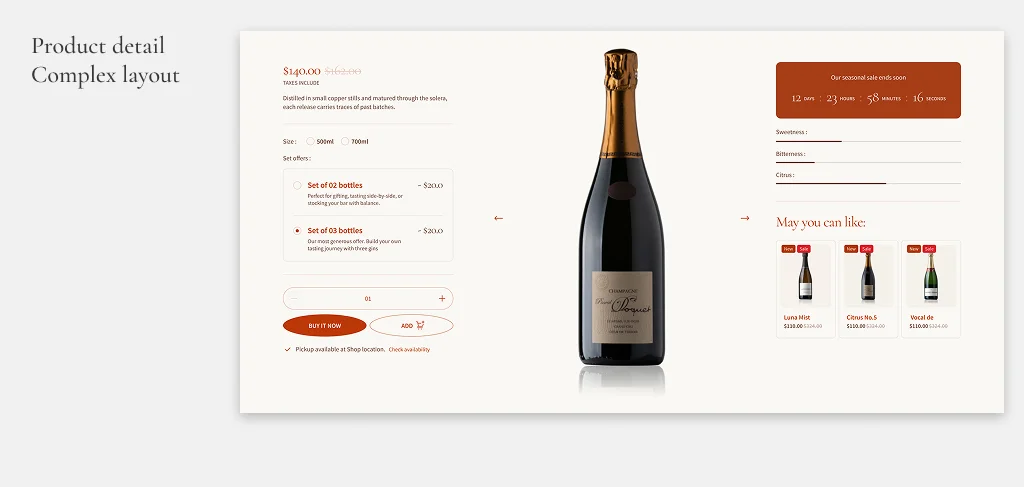
- When to use: Ideal for high-ticket items, limited edition runs, or luxury goods (like premium champagne or gin). The timer creates scarcity/urgency, while the bundle options and side recommendations encourage higher sales.
How to configure:
- Configure the Main Settings:
- Sticky media: Toggle ON.
- Style layout: Select
Complex. - Device: Select
Desktop. - Column: Drag the slider to 1.
- Gap: Select
Global. - Custom Gap: Set the slider to 40 px.
- Add Specific Blocks to the Complex Layout:
- Once the
Complexlayout is selected, an additional tree panel labeled "Details for complex layout" will appear on the right side of the editor. - Click the + Add block button to insert individual components.
- You can configure the following blocks in this order to replicate the layout shown in your screenshot:
Countdown timer(to add urgency).Product spec(Repeat this block 3 times to display specific attributes like sweetness, bitterness, and citrus levels).Divider(Set the style to "None" for a clean break).Recommended products(This block allows you to drag and drop or assign specific products for cross-selling).
Note: You can rearrange these blocks by dragging the handles next to each item.
- Once the
💡 Key Setting Notes
- Sticky Media Behavior: The Sticky media toggle only functions effectively when your Column setting is set to 2. In a 1-column layout, the sticky media setting has no visual effect.
- Gap Control: The Custom Gap slider (measured in px) defines the white space between the main product image and the information blocks. Adjust this depending on how spacious or compact you want your product page to feel.
- Device Specificity: Ensure you have the Device toggle set to
Desktopwhen configuring the initial layout. By default, your theme will handle the mobile responsiveness automatically, but complex layouts may require you to toggle toMobilelater to check specific block placements for mobile screens.
Other features
Volume discount
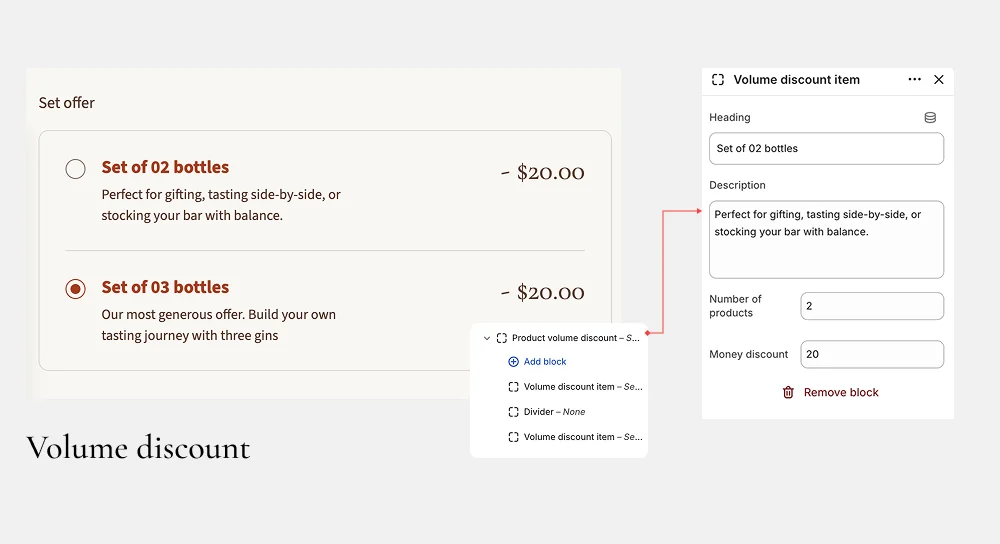
The Volume Discount section allows you to create attractive bundle offers for your customers. It displays multiple quantity tiers (e.g., "Set of 2", "Set of 3") using radio buttons, so shoppers can easily see their bulk savings before adding an item to the cart.
- Locate the Product volume discount block in your theme's block tree (the left menu in your visual builder).
- Click the + Add block button.
- Select
Volume discount itemfrom the list. - If you want visual separation between your offers, add a
Dividerblock between them. - Repeat this process until you have added all your desired offer tiers (e.g., Set of 02 bottles, Set of 03 bottles).
Important: The settings inside your theme builder (shown in the screenshot below) only provide visual guidance on the frontend. They display the text, descriptions, and static discount numbers to the customer.
The theme does not automatically apply these discounts to the cart price or checkout total. You must configure the actual logical discount in your e-commerce platform's admin dashboard (e.g., Shopify Admin > Discounts, or WooCommerce Dynamic Pricing/Rules) to ensure the price is correctly reduced in the customer's cart. Learn more about Shopify discount here
Countdown
This guide walks you through setting up a dynamic countdown timer on your product detail pages. The process involves three main stages: creating a custom metafield, setting a date/time for your product, and configuring the timer block in your theme editor.
Step 1: Create the Product Metafield (Backend)
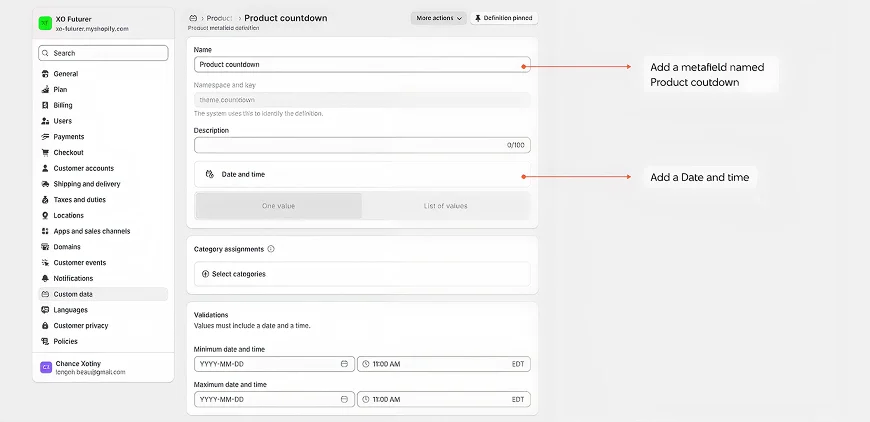
Before the theme can display a countdown, you must define a custom field where you will enter the date.
- Log in to your Shopify Admin dashboard.
- Go to Settings (bottom left) > Custom data.
- Click on Products under the "Metafield definitions" section.
- Click the Add definition button.
- Enter the following details:
- Name:
Product countdown - Type: Select Date and time from the dropdown menu.
- Name:
- Click Save.
Step 2: Assign the Countdown Date to a Product
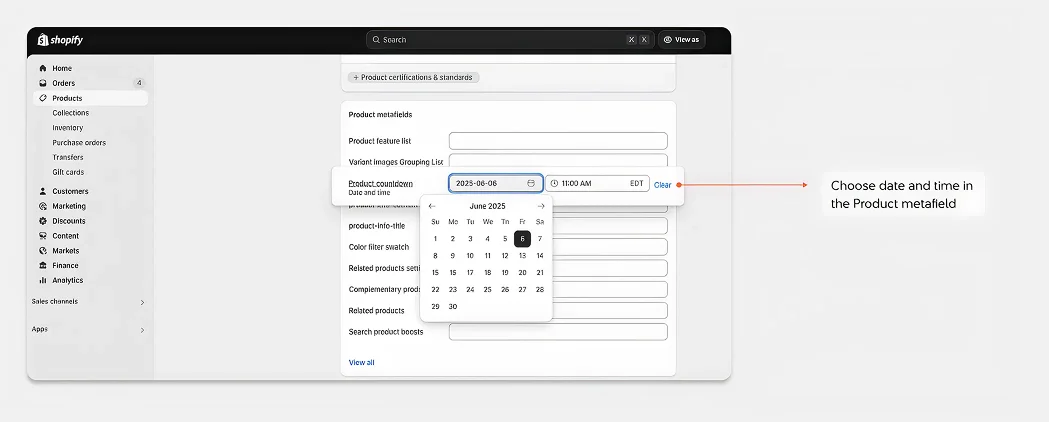
- In your Shopify Admin, go to Products.
- Select the specific product you want to feature the countdown timer for.
- Scroll down to the Product metafields section (usually below the SEO settings).
- Locate your newly created
Product countdownfield. - Click into the field. Use the pop-up calendar picker to select the Date (e.g.,
2023-06-06) and the Time (e.g.,11:00 AM). \6. Click Save on the product page to save this data.
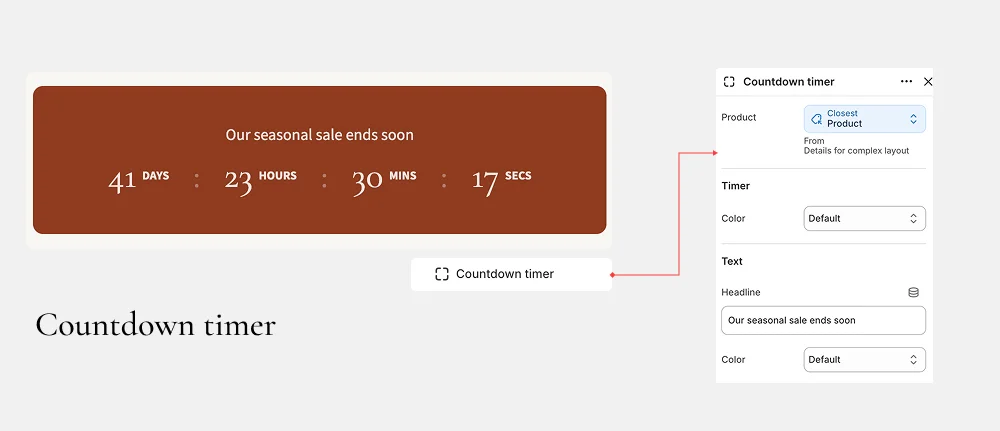
Step 3: Configure the Block in the Theme Editor
- In the left-hand block tree of the theme editor, locate and click on the Countdown timer block.
- Configure the settings in the right-hand panel:
- Product: Select Closest Product (as shown in the screenshot). This tells the block to automatically pull the metafield data from the exact product a customer is currently viewing on the live store.
- Timer Color: Choose the color of the countdown numbers and labels (e.g.,
Default,Light,Dark, or a Custom color). - Text Settings:
- Headline: Customize the text that appears above the timer. Write something compelling to drive urgency, such as:
"Our seasonal sale ends soon","Limited time offer", or"Last chance to buy". - Color: Choose the font color for your Headline text.
- Headline: Customize the text that appears above the timer. Write something compelling to drive urgency, such as:
- Click Save at the top right of the theme editor.